The Soay Sheep Pedicure
When you are putting together your Soay flock business plan, remember you do not need to include haircuts and perms in the expense column. For the most part, Soay will shed their fleece without your help. But you do need to pay for someone to trim your animals’ hooves or, better yet, learn how to do it yourself.
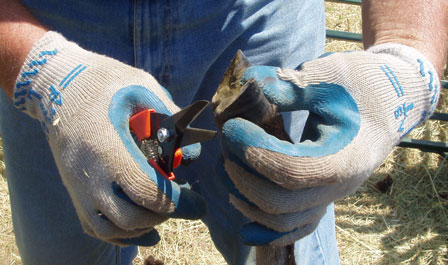
If you have kept up with your reading here, you already know about the Sheep Chair we use at the Saltmarsh Beauty Parlor. So now the ram or ewe is strapped in and ready. You lift up the first hoof, only to be greeted by an irregular-shaped black thing that looks like a partly-melted piece of black plastic embedded with hay shards and grass bits and suffused with the ubiquitous sheep poop. Gaak! Where to begin? What to do?
Off-hand, I cannot think of anything related to Soay husbandry that depends more on trial and error, or benefits more from a little practice, than hoof-trimming. Unless your animals are on gravel 24/7 year-round, their hooves really must be trimmed or the animals will go lame or get impacted or infected hooves. At a minimum, they will be uncomfortable. There is good news on two fronts: the learning curve is steep and fast, and you can find quite a few well-illustrated guides in the sheep literature. Our current favorite, including photos, is at www.fiascofarm.com. Let me just briefly introduce you to trimming and then send you off to the experts. Here is Steve as he starts one hoof:
No two hooves are alike, so I cannot give you a formula or a rule based on inches or centimeters about what to cut off. But the goals are always the same. First, try to end up with the bottom of the hoof flat and the two halves trimmed so that together they form a nice flat platform for the sheep to stand on. We do not want our sheep listing off to one side or favoring one leg over another because of grossly uneven hooves. Remember run-down heels in the bad old days of high-heeled women’s city shoes? Ouch! We want to avoid the ovine equivalent of that curse.
Second, try to leave no flaps of horny material on the sides, or an overly thick heel pad, to get impacted or sore. If you achieve either of these goals, you usually will have achieved the other one, too.
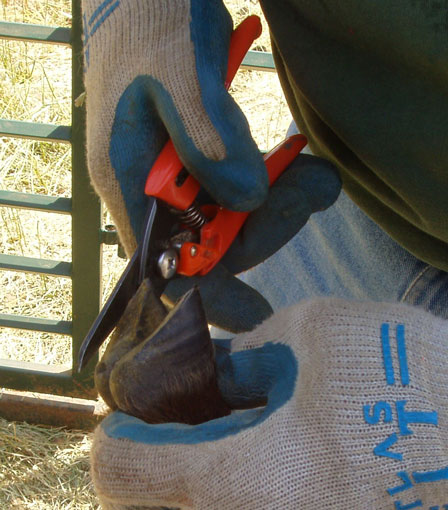
In the next picture, Steve takes off a protruding edge. On some animals, the “heel” portion also will have grown too thick and must be trimmed off. The flaps are easy to spot; judging the thickness of the heel really does take practice, so err on the side of taking less off at first.
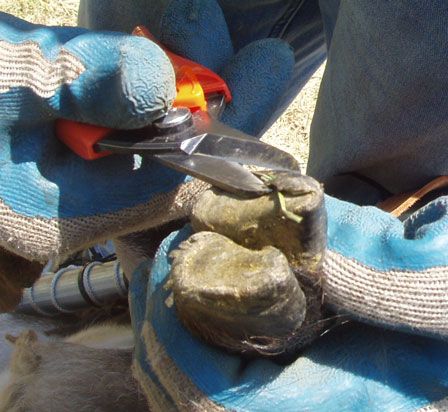
Here is a close-up to show you how a small trimmer operates with more finesse than the bigger pair designed for Suffolks and other hulks.
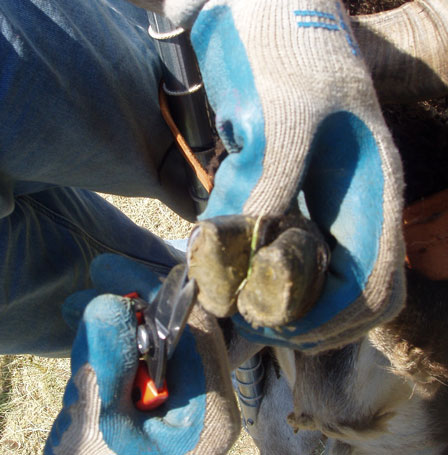
In the next picture, Steve works on the edge closest to him and the fresh edge looks shiny, appearing almost white with the sun glinting off the new surface. Notice the surface of that part of the hoof is now more or less level, with no offending flaps.
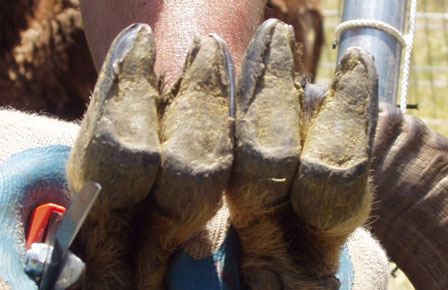
The last photo shows a pair of hooves with all edges and the heel pads in need of trimming. Steve has taken off some of the edges on the animal’s right hoof (on your left, of course), where it is shiny, but there is more work to be done. The hooves are not so overgrown as to cause limping at this point, but another year of growth without trimming probably would cause problems.
Just as your pedicurist needs to judge how much cuticle or heel callus to trim off, my resident Soay pedicurist (Mr. Steven to his valued customers) needed to learn how far to trim without drawing blood. He still misses sometimes, and the sheep register their displeasure by sauntering right past the “tips” jar without breaking stride or even turning their heads.
Maybe next year we will experiment with the latest shades of hoof polish or even massages, but for now …